Set up your first notification
Go to the JIRA administration and the "Manage apps" tab.

On the left side you will find the "Notification Assistant" panel. Click on "Configure Notifications"

You will see the start screen of the Notification Assistant.
Configure your notification
Enter the values that should be valid for your notification.
The attributes
| Attribute | Description |
|---|---|
| Notification Name | Give your notification a descriptive name, i.e. "Remind assignees 24 hours prior to due date". Cannot be the same as another notification name. |
| Description | Give your notification a description to remember the purpose of the notification. |
| Minimum issues to trigger notification | How many issues in the JQL results are required to trigger the notification to be sent. |
| Maximum times an issue can trigger a notification | This is how many times an issue can trigger a notification. Once the difference between the value set here and the number of times an issue has been included in this notification is equal to or less than 0, the issue will not be included in future notifications. |
| Reset issue trigger limit | Tick this box and click save if you want to reset the issue trigger limit. |
| JQL Type | Custom JQL or saved JIRA Filter |
| JQL Expression | You can specify any JQL Expression to be the reason to fire the notification. (If JQL Type is set to Custom JQL) Note that any JQL with user notations like (watchedIssues, votedIssues, etc) will not work, because the JQL is run by a server account. |
| JIRA Filter | Select the filter you want the notification to use. (If JQL Type is set to JIRA Filter). This is useful if you, as an administrator, want to delegate the possibility to define the JQL to query on. |
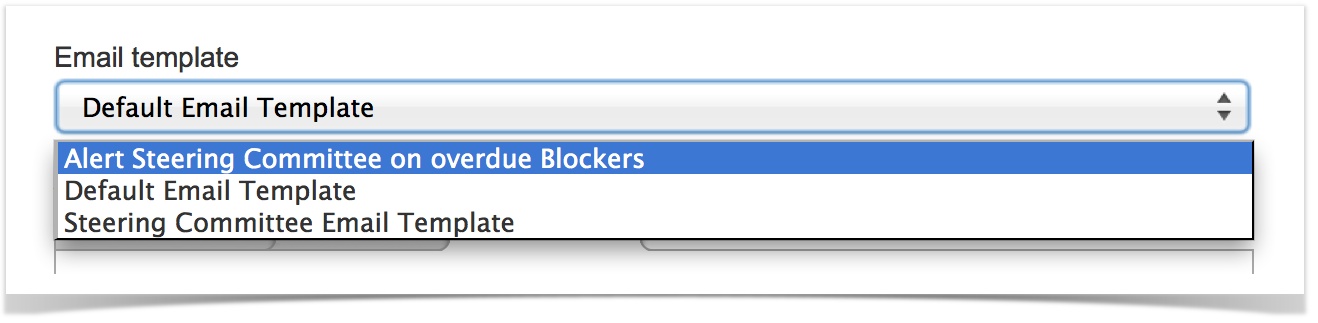
| Email Template | You have to specify the email template for this notification. The email template "Default Email Template" is the default value. |
| Executing User (actor) | Specify the user who the notification should run as. This will impact what issues show up in your JQL specified above. |
| Recipient type People | You can specify recipients with certain attributes in the result set to receive notifications. You can configure Assignee, Reporter, Watchers, and Voters. |
| Recipient type Users | You can select one or more JIRA users to receive notifications. |
| Recipient type Groups | You can select one or more JIRA groups to receive notifications |
| Recipient type Project Role | You can select one or more JIRA Project Roles to receive notifications |
| Recipient type Custom Field | You can choose a custom field of type "Text Field", "User Picker", "Multi User Picker", "Multi Group Picker" or the third party "NFeed Users" and JIRA ServiceDesk "Request Participants" to be the recipients. The custom field of type "Text Field" needs to be populated with one or many valid comma separated email addresses for notifications to be sent. You can add custom fields in the administration menu "Issues / Fields". |
| Recipient type Email address | You can specify one or many email addresses to be the recipient. It can even be an address not registered in JIRA. |
| Recipient type CC Email address | You can specify one or many email addresses to get a carbon copy notification email. It can even be an address not registered in JIRA. |
Trigger Configuration
| Here is where you determine when the notification should fire and in which interval. You can only use one type of trigger configuration for each notification. Select the configuration you want (active tab), the rest of the tabs will be ignored. Trigger by Event If you choose trigger by events, in some cases (like "closed" event) make sure you have set the JIRA event in the post function within the transition. You may choose if you want the notification to respect the "Do not notify me" settings in the JIRA User profile. Trigger by Date/Time Fields If you choose trigger by Date/Time Fields you have to choose a custom field that triggers the start and optional stop. You can specify the interval the notification should be triggered. No interval means that the notification only triggers once. |
| Email Template | Here is where you specify the email template and some more optional ways of notifying.
|
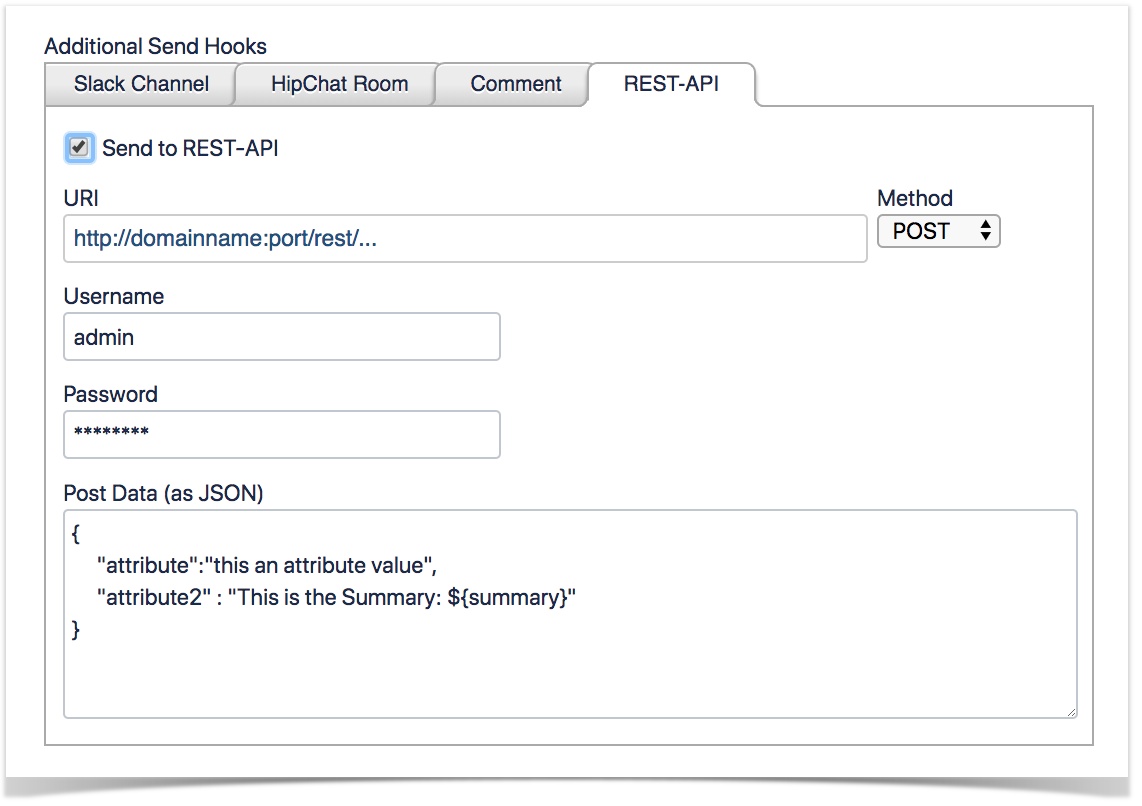
Additional Send Hooks
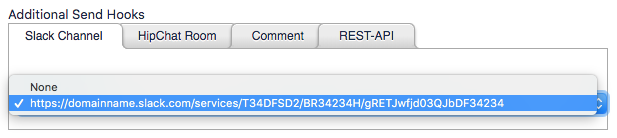
| With "additional send hooks" you are able to notify other internal/external systems besides the ordinary email notifications sent out. Notify a specific Slack Channel. Please follow the steps in the Slack documentation in order to enable Webhooks from Slack's side and generate a URL.
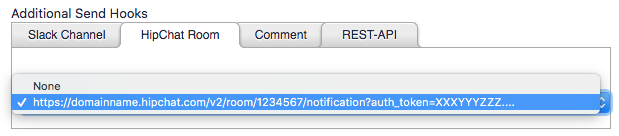
Notify a specific HipChat room.
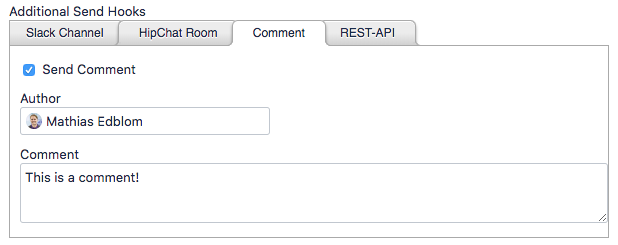
Post a comment to the issues found in the result set.
Call a REST-API that makes the notification really powerful. For example, add or update a page in Confluence, or notify some internal system that need to be triggered in some critical stage. Use placeholders in the posted data to be able to send data depending on the issues in this notification.
|
Your configured notifications
See your configured notifications on the main Notification Assistant screen.

Choose to configure, copy, delete or execute them right away.
Note that notifications that are configured to use the Event trigger configuration cannot be executed right away since they are event driven.
Click the "info" button to get detailed information about the notification:

On this page: